|
In-Depth Getting Started Guide
New to CMS Builder? Not sure where to start? This guide will let you know the exact steps required to set up a basic "News" section in CMS Builder. The fundamental concepts used here can be applied over and over again, so this is a great place to begin.
1. Install CMS Builder
First thing's first - you need to install the software. You can go over the installation instructions here, or you can order an installation from us and we'll take care of it for you!
2. Add a Section Editor
Section Editors are used in CMS Builder to manage content for a particular part of a site. In this case, we want to add a News section to our site, so we'll create a Section Editor to help us manage its content. Let's do that now.
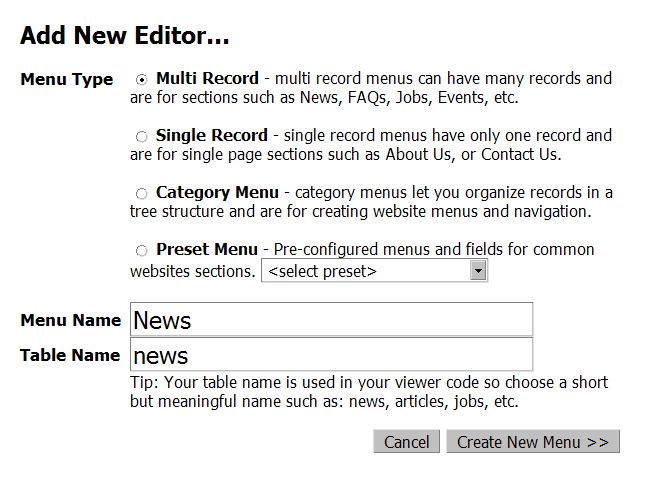
Once you've logged in to CMS Builder, click the Admin link at the top of the page, and then the Section Editors icon. If you're working from a fresh installation, this page should be pretty empty - so let's fill it up! Click the Add New Editor... button. A window will appear with a few radio buttons and a couple of text fields. Each radio button has its own label with a short description. Go over each option's description if you'd like, but for now we'll want to choose the Multi Record option. For the Menu Name field, type in "News". You'll see that the Table Name setting is filled in automatically, which is used in your database for keeping track of your news records. Click the Create New Menu button to move on to the next step.
3. Add Fields to Your Section
Now that you've added the News section, it will appear in the Section Editor list. Let's look at it more closely by clicking the modify link. On this page, you'll notice that there are already several fields set up. The ones that appear greyed-out are system-only fields used by CMS Builder. There is also a field called "dragSortOrder" which you can ignore for now - it's basically a system field too. There are two more fields here which are used for entering content - one called "Title" and one called "Content". Now let's set up a summary description field for our News section.
Click the Add Field button on the bottom-right. A window will appear, prompting you to enter the Field Label, Field Name, and Field Type. Type the word "Summary" into the Field Label box. You'll notice that the Field Name is automatically filled in as before. Now choose "text box" for the Field Type. Once you do this, some other options will be revealed. We can skip over these for now since everything we need for our Summary Description field is already set up. Click Save to create the field.
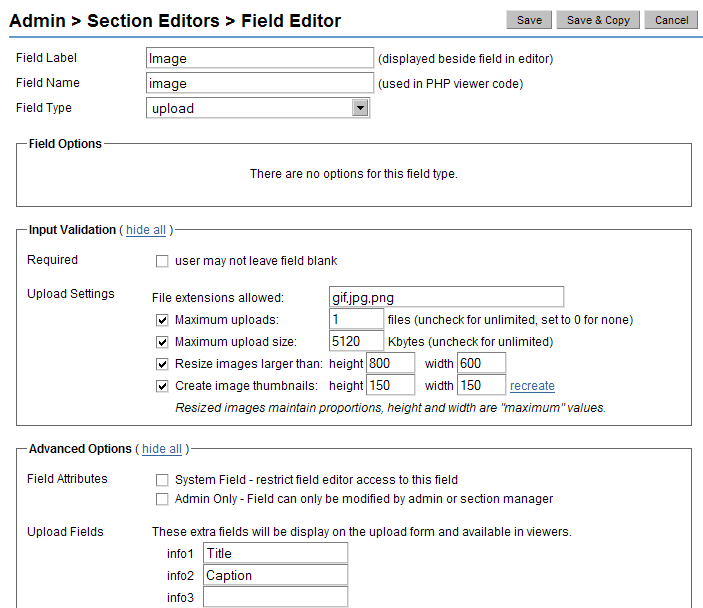
Our News section still needs a field for adding an image, so add that as well. Create a new field as before, but this time we'll type in "Image" for the Field Label setting. For the Field Type, we'll choose "upload". As in the previous step, more settings are revealed once we choose the field type. This time we'll change two of these settings. Find the setting called Maximum uploads. By default this is set to "25", but we only want to allow one image to be uploaded for our field, so change this setting to "1". We also want to limit the accepted file types for this field so that only images can be uploaded. Take a look at the File extensions allowed setting. You should see this entered there: "gif,jpg,png,wmv,mov,swf,pdf". We'll want to take out the non-image file types so that the setting looks like this: "gif,jpg,png". Once the Save button is clicked we'll be done setting up our fields.
Now that the fields are set up, we'll want to change the order that they appear in so that it makes sense to the user editing content on the site. The only change we need to make is the position of the Summary field. This part is easy - just use your mouse to grab the up/down arrow icon to the left of the "Summary" text and move it up so that it's below the "Title" field.
4. Add Some Content
Now we can take a breather from the technical stuff and add in some content to the news section. You probably noticed that a link called "News" appeared in the CMS Builder menu bar after you created that section. Click that link now to start adding in content.
Right now you don't have any records entered into this section, so a "Sorry, no records were found!" message is displayed. Click the Create button to make your first News record. Here you'll be presented with the fields that we had set up in the previous step. Enter in some text to each field, upload an image, and click Save. Add in another record or two before moving on.
5. Use the Code Generator
Now that we have our Section Editor set up and some content added into it, we need to display it on our web page. CMS Builder's Code Generator is used to automatically create the PHP code required to pull the content out of your database and display it on your site. Let's use the Code Generator now by clicking the Admin link, and then the Code Generator icon.
First, let's generate the code used to display the list of News records. For the Select Section setting, choose "News". The List page setting should already be set, which is great - we want to use that. The rest of these settings are fine, so click the Show Code button.
Here you'll be presented with a box containing a bunch of HTML and PHP code. Don't worry about looking at this too closely right now. Create a new plain text file on your computer and paste the code from the Code Generator box into it. You may have noticed that CMS Builder asks that we name this file "newsList.php". You can name this file whatever you'd like, but in this case we'll follow CMS Builder's suggestion and name this file "newsList.php".
Now we need to set up the detail page for our news records that the list page links to. Go back to the Code Generator page and select your "News" section, but this time choose the Detail page option. Once again all of these settings are fine as they are, so hit the Show Code button. Create another plain text document and paste this code into it, this time saving the file as "newsDetail.php".
6. Set Your Viewer Url Settings
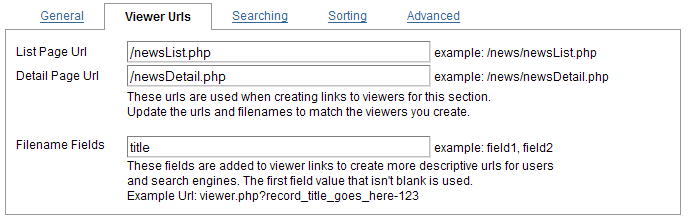
In the previous step, you may have noticed that once the code was generated for our News section pages, CMS Builder displayed a message stating that we need to update the Viewer Url settings. Let's do that now. Click the Admin link, and then Section Editors. Click the modify link for our News section, and then the Viewer Urls link at the top of the page. Let's assume that you're putting these pages in the root web directory on your server, so for the List Page Url setting type in "/newsList.php", and for the Detail Page Url setting type in "/newsDetail.php", then click the Save Details button.
7. Upload the Pages to Your Site
The last step is going to be uploading the "newsList.php" and "newsDetail.php" pages we created earlier. Use your FTP program to upload the "newsList.php" and "newsDetail.php" files to the root web directory on your web server. If you navigate to http://www.yoursite.com/newsList.php, you should see the News records you created earlier being listed. If you click one of the record links, you should be taken to the "newsDetail.php" page which loads the content for this record.
Conclusion
From here, you'll probably want to start using CMS Builder with your own site's design. You can either modify the design of the files that the Code Generator creates for you, or you can copy and paste sections of the code from the Code Generator onto a page you already have designed. Take a look at the Working With Generated Code Guide guide for more information on working with CMS Builder's generated code.
|